
How to Replace a Thermostat Without Blowing the Fuse in Your Air Handler
A Klein Cooling guide for technicians, homeowners, and everyone who just bought the new Nest
Replacing a thermostat is easy.
Usually.
It’s six…
Seven…
No.
We’re not doing that here.
If you’re reading this and it’s not 2025 anymore…
For historical context, “6-7” was a thing Zoomers started saying constantly in 2025.
What did it mean?
Nobody knows.
Why was it funny?
Nobody knows.
Why did an entire generation suddenly feel compelled to yell “SIX SEVEN!” every time those two numbers appeared anywhere near each other?
Again:
Nobody knows.
It was one of those pieces of internet culture that apparently didn’t require a joke, a punchline, or even a discernible reason for existing.
Then the millennials found it.
And we did what millennials do best:
We hijacked it, started saying it ourselves, and made it so painfully uncool that the children could no longer enjoy it.
You’re welcome, America.
The 6-7 meme had a good run. It was beaten into the ground, resurrected, beaten into the ground again, adopted by people with mortgages and lower-back pain, and is hereby officially retired from AC University.
Rest in peace, 6-7. 🪦
Anyway.
Replacing a thermostat involves a handful of little wires, a couple of screws, and maybe 20 minutes of your life.
Unless you forget Step One.
Then it’s a handful of little wires, a $200 thermostat, a completely dead air conditioner, 45 minutes wondering what went wrong, and eventually:
“Honey, where are the keys to your car?”
We’ll get to that.
Step 1: Turn Off the Breaker
Not the thermostat.
The breaker.
Putting the thermostat in OFF does not remove the 24-volt power going to it.
Your thermostat receives low-voltage power from the HVAC system. If you pull it off the wall with everything energized and accidentally touch R to C, there’s a pretty good chance you’re going to pop the low-voltage fuse.
And suddenly:
Thermostat: blank.
Air handler: dead.
Outdoor unit: dead.
You: staring at the thermostat you just installed.
The good news is you probably didn’t destroy anything.
You may have simply blown a fuse.
Already did it?
Go to the air handler and look for the low-voltage fuse.
It’s commonly a small automotive-style 3-amp or 5-amp blade fuse on or near the control board.
Don’t have one?
Pop the hood of your wife’s car.
Somewhere in that fuse box is probably a 3- or 5-amp fuse that suddenly looks a whole lot less important than getting this air conditioner running.
And if you’ve been doing HVAC long enough, you already know where this story goes.
You get the system running.
You pack up.
You drive home feeling pretty good about yourself.
The next morning:
“Why don’t my power mirrors work?”
No idea, babe.
Probably unrelated.
We’ve all been there.
Homeowners: we’re joking. Please buy the correct replacement fuse.
Technicians: you know what you did.
Step 2: Take a Picture Before You Touch Anything
Pull the thermostat face away from the wall enough to expose the terminals.
Then stop.
Take a picture.
A good one.
You want to clearly see every conductor and the terminal it’s connected to.
You’ll probably see some combination of:
R — C — Y — G — O/B — W/W2/AUX
Take that picture before removing a single wire.
Do not trust your memory.
Every HVAC technician eventually experiences the character-building exercise of staring at a bundle of loose thermostat wires hanging out of drywall and thinking:
“I’m pretty sure blue was C.”
Take the picture.
Step 3: The Letters Matter More Than the Colors
There are conventional thermostat wire colors.
| Terminal | Typical Color | What It Does |
|---|---|---|
| R | Red | 24-volt power |
| C | Blue | 24-volt common |
| Y | Yellow | Compressor / heat-pump call |
| G | Green | Indoor blower call |
| O/B | Orange | Reversing-valve control |
| W/W2/AUX | White | Auxiliary electric heat |
Simple enough.
Except there’s one important rule:
Electricity does not care what color the insulation is.
These colors are conventions, not laws.
The last guy could have used blue for Y.
He could have used yellow for common.
He could have used purple for O.
He could have used whatever conductor was available at 4:57 on a Friday afternoon.
Trust the terminal designation, not the color.
If a blue conductor is connected to C, that’s your C wire.
Label it C.
Step 4: What Do These Wires Actually Do?
Before moving anything, it helps to understand what you’re looking at.
A conventional thermostat isn’t performing sorcery inside the wall.
At its simplest, it receives 24-volt power at R and uses that power to send different calls to the HVAC equipment.
R — 24-Volt Power
Think:
R = source.
The HVAC system supplies the thermostat with 24-volt power through R.
C — Common
C is the other side of the 24-volt circuit.
Modern electronic thermostats commonly use R and C to power themselves continuously.
That’s the famous “C wire.”
Not particularly mysterious once you know what it does.
Y — Compressor / Heat Pump
Y calls for compressor operation.
On a heat pump, Y is normally involved in both cooling and normal heat-pump heating.
G — Indoor Blower
G calls for the indoor blower.
Here’s something useful when you’re learning thermostat wiring:
G stops at the air handler.
It doesn’t need to go to the outdoor heat pump.
Why?
The blower is inside.
O/B — Reversing Valve
This controls the heat pump’s reversing valve.
On a typical O configuration, the reversing valve is energized during cooling.
Some equipment uses B logic, where the valve is energized during heating.
Remember this one.
It becomes important when we get to everyone’s favorite shiny hockey puck.
W/W2/AUX — Auxiliary Heat
This calls for backup heat—typically the electric heat strips inside the air handler on a Florida heat-pump system.
Here’s What That Looks Like
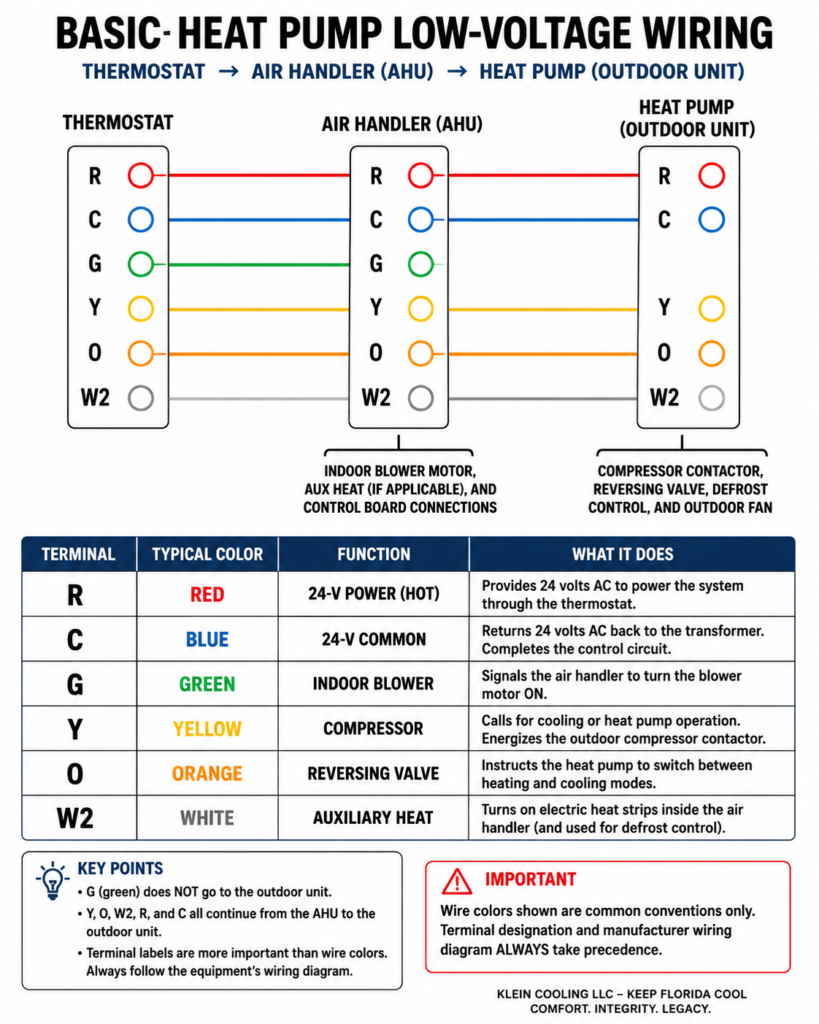
We intentionally made this diagram stupid simple.
That’s the point.
We’re not showing every relay, safety, defrost control, sequencer, contactor and internal component.
We’re answering one question:
Where do the basic field wires go?
Once you understand that, reading an actual factory schematic becomes considerably easier.
Step 5: Label Every Wire Before Removing It
Before disconnecting anything, label each conductor according to the terminal it’s connected to on the old thermostat.
Not its color.
Its terminal.
R gets labeled R.
C gets labeled C.
Y gets labeled Y.
And so on.
Then remove the wires.
And now we arrive at another rule learned through suffering:
DO NOT LET THE THERMOSTAT WIRE FALL INTO THE WALL.
Tape it to the wall.
Wrap the conductors around a pencil.
Clip them to something.
Whatever.
Just don’t stand there and watch the thermostat cable disappear into a hole in the drywall.
If you do, congratulations.
You have upgraded yourself to the:
Premium Thermostat Installation Package
Now featuring fishing tools, drywall, profanity and an additional two hours of labor.
Step 6: Install the New Thermostat Base
Remove the old thermostat base.
Feed the conductors through the new base.
Level it if necessary.
Mark your holes.
Install anchors if needed.
Secure the base.
Pretty straightforward.
Unless you bought the new Nest.
Because apparently after decades of thermostats being roughly thermostat-sized, somebody decided America’s hallways needed a giant shiny rectangle.
The old Nest was a tasteful little circle.
The new one looks like somebody mounted a small television to your wall so you can receive breaking news that it’s 76 degrees in the living room.
But you bought it.
We’re committed now.
Step 7: Transfer the Wiring
Connect the conductors to the appropriate terminals on the new thermostat.
Generally:
R → R
C → C
Y → Y/Y1
G → G
O/B → O/B
W/W2/AUX → the appropriate auxiliary-heat terminal
But—and this matters—
Read the instructions for the thermostat you’re installing.
Different thermostats use different terminal arrangements.
Some terminals can perform different functions depending on configuration.
Don’t assume.
And don’t start improvising because the new thermostat doesn’t look exactly like the old one.
Step 8: Congratulations. You Wired It Correctly.
You’re halfway done.
This is where a surprising number of thermostat installations go sideways.
A thermostat can be wired perfectly and still operate the HVAC system incorrectly.
Why?
Because modern thermostats need to know what kind of equipment they’re controlling.
For a typical Florida split heat pump with electric backup heat, you’re generally telling the thermostat something along the lines of:
Heat pump
Air-to-air
Electric auxiliary heat
Correct number of compressor stages
Correct reversing-valve operation
That last one is important.
Very important.
Which brings us to…
Oh Good. You Bought a Nest.
Look.
We understand.
It’s shiny.
It connects to your phone.
The box looked fantastic sitting there at Home Depot.
And compared with the beige rectangle that has been hanging on your wall since the Bush administration, it looks like the future.
But the Nest doesn’t magically know what HVAC equipment you own.
You have to tell it.
And one of the things it needs to know is how your reversing valve operates.
Configure that incorrectly and you can create one of our favorite service calls:
Homeowner selects COOL.
Thermostat says:
COOLING
Heat pump says:
LOL.
Warm air starts pouring out of the vents.
The homeowner stares at the shiny new thermostat.
The shiny new thermostat stares back.
Eventually our phone rings.
“But the thermostat is brand new.”
We know.
We can see it from the driveway.
Step 9: Stop Pressing NEXT
Smart-thermostat setup asks questions about your HVAC equipment for a reason.
Please don’t do this:
NEXT
NEXT
NEXT
HEAT PUMP? SURE
O OR B? I DON’T KNOW
NEXT
AUXILIARY HEAT? PROBABLY
NEXT
LOOKS GOOD
DONE
And then call us because your heat strips are running in August.
Read the questions.
If it asks whether you have a heat pump, verify it.
If it asks what type of auxiliary heat you have, verify it.
If it asks about O/B operation, verify it.
If you’re unsure what equipment you have, look at the equipment documentation.
Don’t let the thermostat interview you about your HVAC system and just start making stuff up.
Step 10: Restore Power
Before turning the breaker back on:
Check the wiring one more time.
Make sure every conductor is fully seated.
Make sure bare copper isn’t touching an adjacent terminal.
Make sure the thermostat is mounted properly.
Then restore power.
The thermostat should power up.
And remember:
HVAC equipment has delays.
The compressor may not start immediately.
Some thermostats and control boards intentionally delay compressor operation for several minutes.
Don’t press COOL, wait seven seconds, panic, pull the thermostat back off the wall, short R to C, blow the fuse and end up underneath the hood of your wife’s car.
We’ve already covered this.
Step 11: Test the Fan
Set:
FAN → ON
The indoor blower should operate.
Then return it to:
AUTO
Congratulations.
You have officially proven G does something.
Step 12: Test Cooling
Create a cooling call.
Then go verify what the equipment is actually doing.
You want:
Indoor blower — ON
Outdoor unit — ON
Compressor — ON
Cool air — coming from the registers
Don’t stand in front of the thermostat and conclude everything works because the screen says:
COOLING
The thermostat can say whatever it wants.
Go look at the equipment.
Step 13: Test Heat
Now create a normal heat-pump heating call.
Verify:
Indoor blower — ON
Outdoor unit — ON
Warm air — being delivered
This is where an incorrectly configured O/B setting often reveals itself.
If you call for heat and get cooling—or call for cooling and get heat—don’t immediately conclude the heat pump has suffered some catastrophic failure.
Think about the thing you literally just changed.
Step 14: Test Auxiliary Heat
If the system has electric auxiliary heat, verify that it operates when appropriate.
And technicians:
Actually verify it.
Don’t see 24 volts on W2 and write:
HEAT KIT GOOD 👍
W2 is a control signal.
You still have controls, relays or sequencers, limits, elements and line-voltage circuits downstream.
Verify actual operation.
For the Technician: The Job Isn’t Done Because the Thermostat Lights Up
This is where the homeowner installation and professional service call should start to look different.
If you’re replacing a thermostat on a service call, finish diagnosing the system.
Verify the thermostat, blower, outdoor unit, compressor, reversing-valve operation, cooling, heating, auxiliary heat when applicable, and—most importantly—the customer’s original complaint.
If you changed installer settings, document the configuration.
Remember:
Don’t diagnose the part. Diagnose the system.
A thermostat displaying a temperature proves that you successfully powered a thermostat.
That’s about it.
Bonus Round: What the Heck Is Defrost?
Since we’re already here, let’s explain something every heat-pump owner eventually notices.
During winter heating, the outdoor coil gets cold.
Sometimes very cold.
Moisture in the outdoor air can freeze onto that coil.
Eventually the heat pump needs to get rid of the frost.
So it enters defrost.
On a typical conventional heat pump, during defrost the outdoor controls essentially:
Keep the compressor running.
Temporarily shift the refrigerant circuit into cooling.
Shut off the outdoor fan.
Typically bring on auxiliary electric heat indoors.
Why?
Running the refrigerant circuit in cooling sends hot refrigerant through the outdoor coil.
Stopping the outdoor fan helps that coil warm up faster.
And the electric heat indoors helps keep the air coming from the registers from getting uncomfortably cold while all of this is happening.
Once the outdoor coil warms sufficiently, the system returns to normal heating.
So if you’re outside on a cold morning and suddenly hear:
WHOOSH.
Then see steam pouring off your heat pump…
Relax.
Your heat pump probably hasn’t exploded.
It’s taking a shower.
What If Everything Is Dead After You’re Finished?
Let’s revisit our first question:
Did you turn off the breaker before changing the thermostat?
“No.”
Fantastic.
We’re getting somewhere.
Go to the air handler and inspect the low-voltage fuse.
If it’s blown and you know you accidentally shorted the thermostat wiring, you’ve probably found your problem.
Replace it with the correct fuse type and rating.
But here’s the important part:
If the replacement fuse blows again, stop.
Do not install Fuse Number Two.
Then Fuse Number Three.
Then a bigger fuse because:
“Maybe it just needs more amps.”
Absolutely not.
The fuse is protecting the low-voltage circuit.
If it keeps opening, something is wrong.
Find the short.
About Your Wife’s Car…
We should probably clarify something.
Earlier, we suggested popping the hood and looking for a 3- or 5-amp fuse.
We’re kidding.
Mostly.
Because every HVAC technician who’s been doing this long enough has, at some point, discovered that the service truck contains:
zero 3-amp fuses
while the vehicle sitting ten feet away contains:
several extremely promising candidates.
So you borrow one.
You get the air conditioner running.
Customer’s happy.
You’re happy.
You drive home.
Everything is wonderful.
Until the next morning:
“Why don’t my power mirrors work?”
Huh.
That’s weird.
Probably unrelated.
We’ve all been there.
Homeowners: buy the correct fuse.
Technicians: restock your damn truck.
The Bottom Line
Replacing a conventional thermostat really isn’t that difficult.
But the details matter.
Turn off the breaker.
Photograph the old wiring.
Label conductors by terminal—not color.
Don’t lose the wire inside the wall.
Transfer the wiring correctly.
Configure the thermostat for the equipment you actually own.
Restore power.
Test every operating mode.
And if you bought the new Nest…
That’s okay.
We still love you.
We just wish you’d kept the old one.
One Last Thing
If you got halfway through this article and decided:
“You know what? Maybe I don’t want to do this.”
Excellent decision.
Put the thermostat back in the box.
Call us.
We’ll install it.
We’ll even install the Nest.